Aura Reading & Embroidery Inspired Birthday Card

For my friend Wendy’s birthday I was feeling artsy and wanted to make her a card instead of buying one.

A little background about Wendy: I met her when I first moved to New York and over the past year our friendship has grown and I have come to really adore her great fashion sense, corky humor and kindhearted spirit. And when I found out that we shared a mutual passion for Oprah and Flamin' Hot Cheetos I was convinced that I found my soul mate. No, I am not kidding.

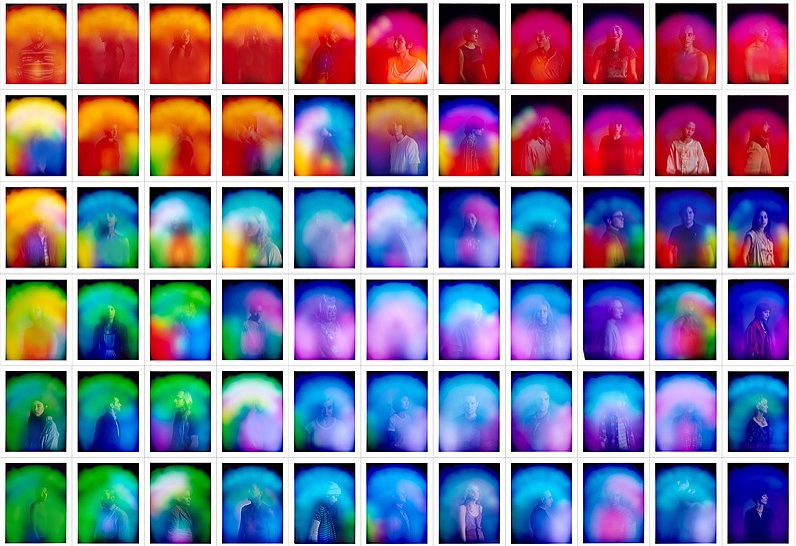
Well, Wendy and a few of our friends regularly get their auras read. I have yet to do an aura reading myself so am not 100% sure what it entails but to my understanding a photo is taken of you, and what is revealed is an image of yourself accompanied by different colors that correspond to the energy fields that you are emanating. What is going on your life will determine what colors will appear in your reading.

Color Meanings: Red (vital), orange (optimistic), yellow (creative), green (healing), blue (tranquil), purple (magical)

Knowing that Wendy was going through a transitional time in her life I wanted to create something that was vibrant and incorporated as many colors as possible – to shower her with as many positive energies via a birthday card. During this time I was also feeling a bit fatigued with using only the color black with my floral illustrations so I was really relieved to ‘paint’ the rainbow. In addition, I was reminded of these beautiful embroidery paintings by Sabatina Leccia I had pinned awhile ago. They are just so lovely in their texture, color and fluidity.

YouNah_Wendy_Card_Sabatina_Leccia2.jpg
YouNah_Wendy_Card_Sabatina_Leccia.jpg
YouNah_Wendy_Card_Sabatina_Leccia4.jpg
YouNah_Wendy_Card_Complete1.jpg

PAINTing OUTSIDe THE LINES…the lines that sometimes don’t exist.

I will say I am the type of person who colors inside the lines but in this instance I had the paints guide me to where ever they wanted to go. In between each brush stroke of acrylic paint, I would add water droplets and rotate the paper up and down and side to side so that the wet liquids would roll and bleed into each other. Then I stippled dots with the pointed end of a skewer stick to mimic the embroidery in Sabatina’s work.

I was quite happy with how this little piece came out. I knew I wanted to incorporate the colors of the rainbow in an organic and fluid way that would celebrate all the vibrancies of life that would serve as a small reminder for Wendy that life has its ups and downs but that we are all constant ‘works in progress’ and that the important thing is continuously strive to grow and elevate ourselves.

Happy birthday to my friend Wendy. I wish all good things for her in 2019 and that this random card brings her the same bit of serenity and joy that I felt while painting it.

And I cannot think of a more appropriate way to end this post then with an Oprah quote:

“The biggest adventure you can ever take is to live the life of your dreams.”
YouNah_Wendy_Card_Complete2.jpg

Tattoo Illustration

When my friend Kym asked me to illustrate a tattoo idea for her I had a mini panic attack. I was so shocked that she would entrust me with something so permanent, but she reassured me that what she was looking for was a rough sketch that the tattoo artist would then reference to translate into his or her style. Kym was definitely more confident in my abilities than I was – she believed that my floral illustration style would lend itself nicely to what she had in mind for a tattoo she was hoping to get for her birthday. I reluctantly agreed to my friend’s ask.

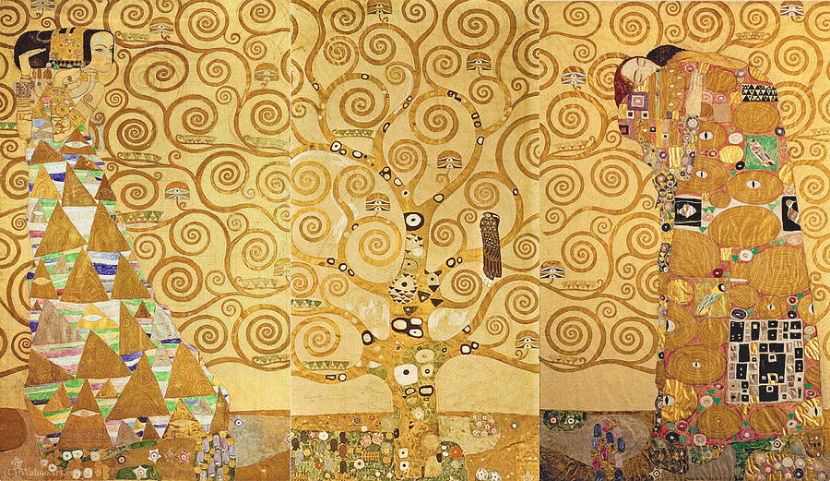
So, the brief: A tattoo that would pay homage to Kym’s parents. She wanted to incorporate a bauhinia flower for her dad’s Hong Kong side, a narra tree branch for her mom’s Filipino side and their shared astrological sign of the Aries ram. She also wanted to incorporate swirls similar to those found in Gustav Klimt paintings.

Bauhinia, the official flower of Hong Kong, the birthplace of Kym’s dad

Bauhinia, the official flower of Hong Kong, the birthplace of Kym’s dad

Narra, the national tree of the Philippines, the birthplace of Kym’s mother

Narra, the national tree of the Philippines, the birthplace of Kym’s mother

Illustration references of ram skulls and antlers interlocked with flowers

Illustration references of ram skulls and antlers interlocked with flowers

‘The Tree of Life’ by the Austrian painter Gustav Klimt

‘The Tree of Life’ by the Austrian painter Gustav Klimt


Kym also asked that the illustration feel feminine and detailed, referencing vintage botanical illustrations. I had all the information I needed and a relaxed deadline of a few months, but I felt completely incapable of starting.

I would run into Kym a couple times on my way to and from work, when she would casually ask me how the illustration was coming along. After each encounter, I was convinced that the universe was nudging me to just GET ON IT.

YouAndNah_Tattoo_Illustration_botantical_drawing.png

I distinctively remember sitting on the couch on a lazy Sunday afternoon timidly drawing a line and then another on my iPad. Then, something magical happened. With each stroke I felt myself falling into an almost meditative drawing groove. “You got this, you were freaking out over nothing,” I thought to myself.

The below are some of my preliminary drawings. I really tried to have all the floral elements feel like they were effortlessly weaving in and out of the ram’s skull. Kym and I both agreed that the Klimt-inspired swirls might be best saved for another tattoo as they felt a bit too graphic compared to the organic elements.

YouAndNah_Tattoo_Illustration_1.jpg
YouAndNah_Tattoo_Illustration_2.jpg

This is the final illustration l gave Kym. To my relief and complete delight, she said it was beyond what she was hoping for and that it really captured what she had been toying with in her mind. What a compliment! I was really excited to see how the tattoo artist would translate my illustration into a permanent piece of body artwork.

YouAndNah_Tattoo_Illustration_3.jpg
YouAndNah_Tattoo_Final_1.jpg
 

“CHOOSE FEAR”

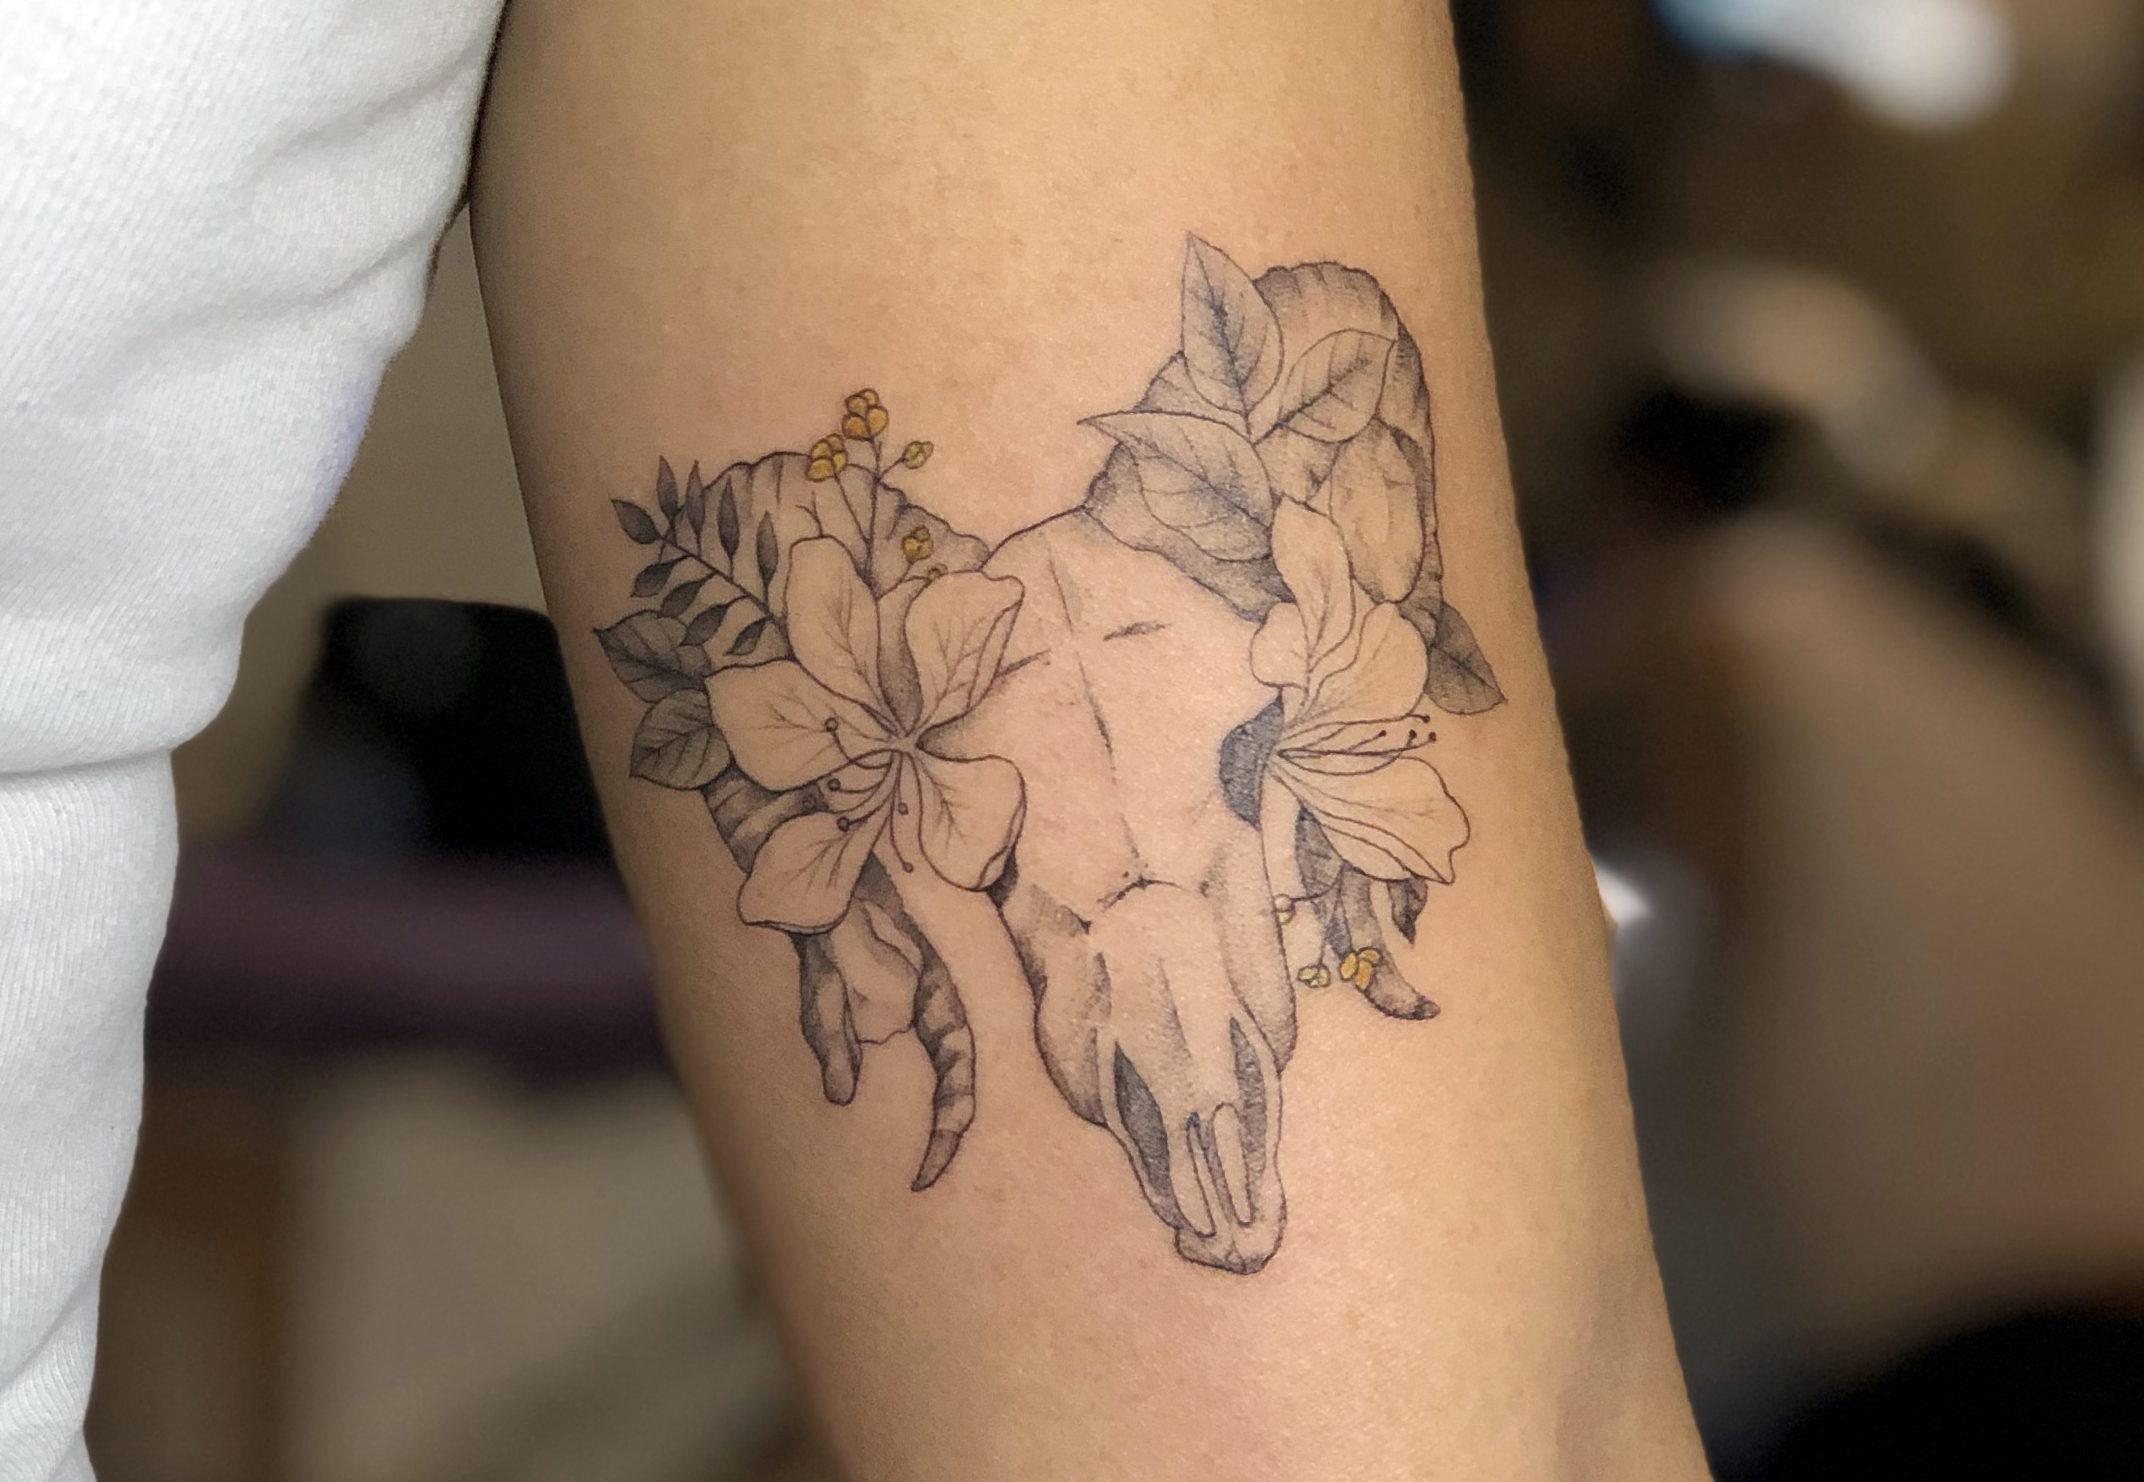
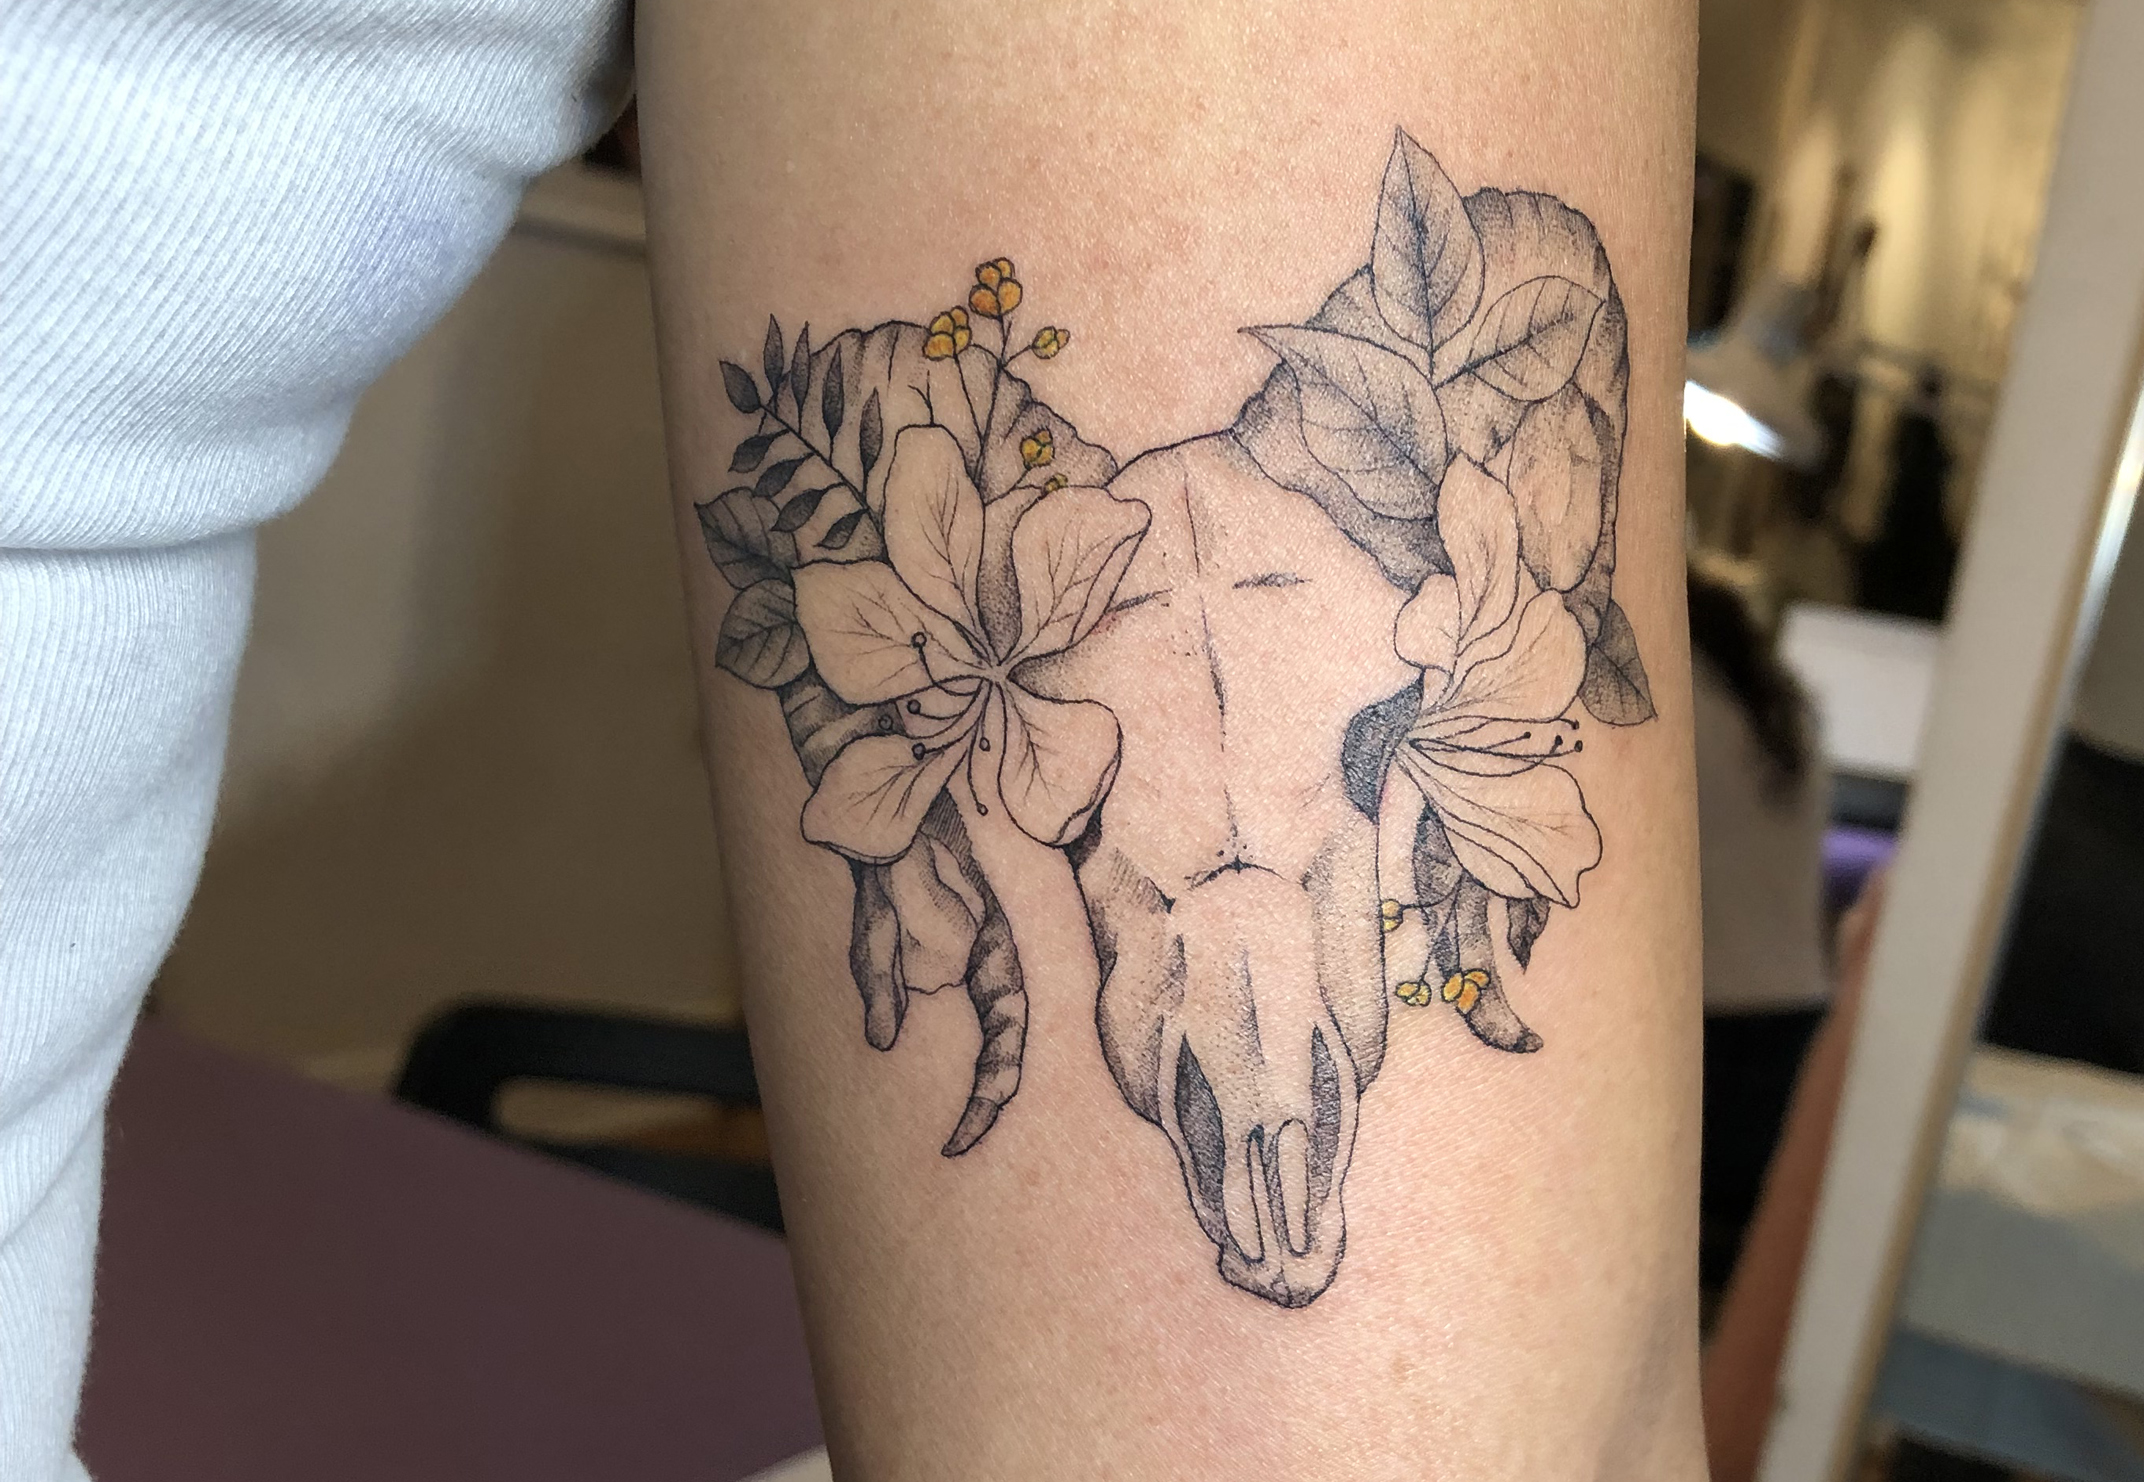
So this is the tattoo! I was surprised that the artist really did not deviate from my illustration and when I saw it in person I marveled at how much detail the artist was able to fit into a fairly small area. Just wow!

This experience really taught me to not be so afraid to go out of my comfort zone. It is something I intellectually know, but the fear of disappointing and not meeting my friend’s expectations almost deterred me from take on this project. I was actually completely capable of doing it and am so glad I did.

Thank you so much Kym for letting me be part of this tattoo journey with you, especially with something that represents your parents. Now, I am forever attached to you. Haha.. (˘・ᴗ・˘)

YouAndNah_Tattoo_Final_2.jpg

Details, detaiLs, details!

YouAndNah_Tattoo_Final_3.jpg

"It's All About the Ring" Engagement Announcement Gif

JB asked me to marry him a few minutes after November 11 while overlooking the Hong Kong skyline. 

I had a feeling JB might propose during this vacation because he continously suggested we go to the Peak or the Tsim Sha Tsui Promenade to see the city that we once called home in all its glory. We managed to find some time during the last night of our trip and as we were making our way to the waterfront I could not help but ask if he was going to propose. He cooly said “No.”

And, then it happened. I will not bore you with the details, but will say I was completely surprised even though I had quizzed him few moments earlier. My response to his question was “Ummmm, I guess sooooooo?!” And instead of being filled with complete joy, both of us commented how weird we felt and anxious of the impending task of telling our family and friends. I was surprised by my initial reaction but realized how we felt was so awkwardly us. And, I love that we were so honest about our feelings.

youandnah-engagement-announcement-gif-hong-kong.jpg

After telling our immediate family and friends privately, I had to figure out how I wanted to make our engagement social media official. Because if you don’t post on Instagram, did it even happen? *eye roll*

I had an idea of an animated gif that would show JB poking fun at the notion that girls are more excited about the ring than the engagement itself. You could say that I am one of these girls as I love anything sparkly, so much so that JB calls me a magpie, a bird that supposedly is attracted to shiny things. I picked up a gaudy plastic diamond ring for JB to outshine my ring and worked on figuring out what poses I wanted to capture. This incredibly simple exercise gave me a newfound appreciate for movies, which need the acting, script, sound, music, visual effects, etc to all come together to seamlessly tell a story.

youandnah-engagement-announcement-gif-plastic-ring.jpg
 

Once we figured out the photo sequence, wearing the same clothes that we got engaged in, JB and I snapped away. We captured moments of sweet bliss, JB’s looks of despair while I was being my wacky self and of my eye rolls towards JB that have become trademark expressions of our relationship. 

youandnah-engagement-announcement-gif-collage.jpg

I posted this gif to my Instagram during brunch at Bedford & Co. JB and I proceeded to drink away our anxiety of everyone knowing by downing 3 bottles of prosecco. I eventually blacked out – sooooo classy, I know.

I just love how it turned out – it so perfectly reflects us as a couple, who are willing to point fun at themselves, and now can continue doing so as each other’s fiancés. Blah, I am still getting used to saying the ‘F’ word. I’ll get there…eventually.

youandnah-engagement-announcement-gif-complete.gif

Note: I hope you do not think I am super vain with all these similar photos of me and JB. I just really wanted to show all the pictures that made up the animation. (˘・ᴗ・˘)

Bruno Mars Inspired Halloween Costume

I love Bruno Mars. I think he is an incredible talent with a powerhouse voice and effortless dance moves. And, oh how he makes me melt when he flashes his pearly whites. I will say, though, it is not lost on me that he has been accused of cultural appropriation and repurposing the sounds of past artists but I love how joyous and happy his songs make me feel.

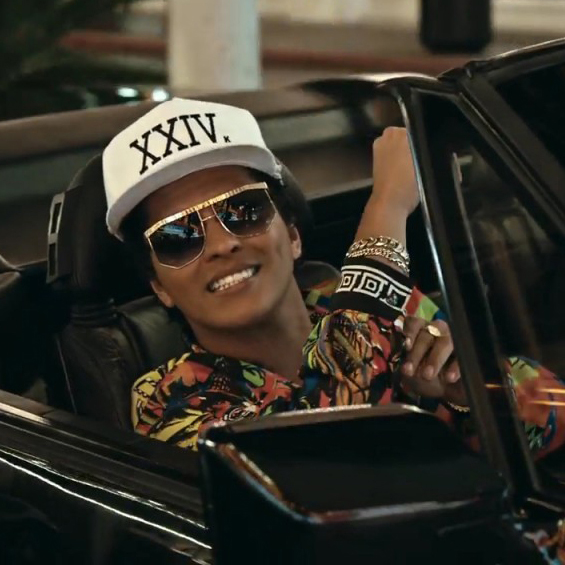
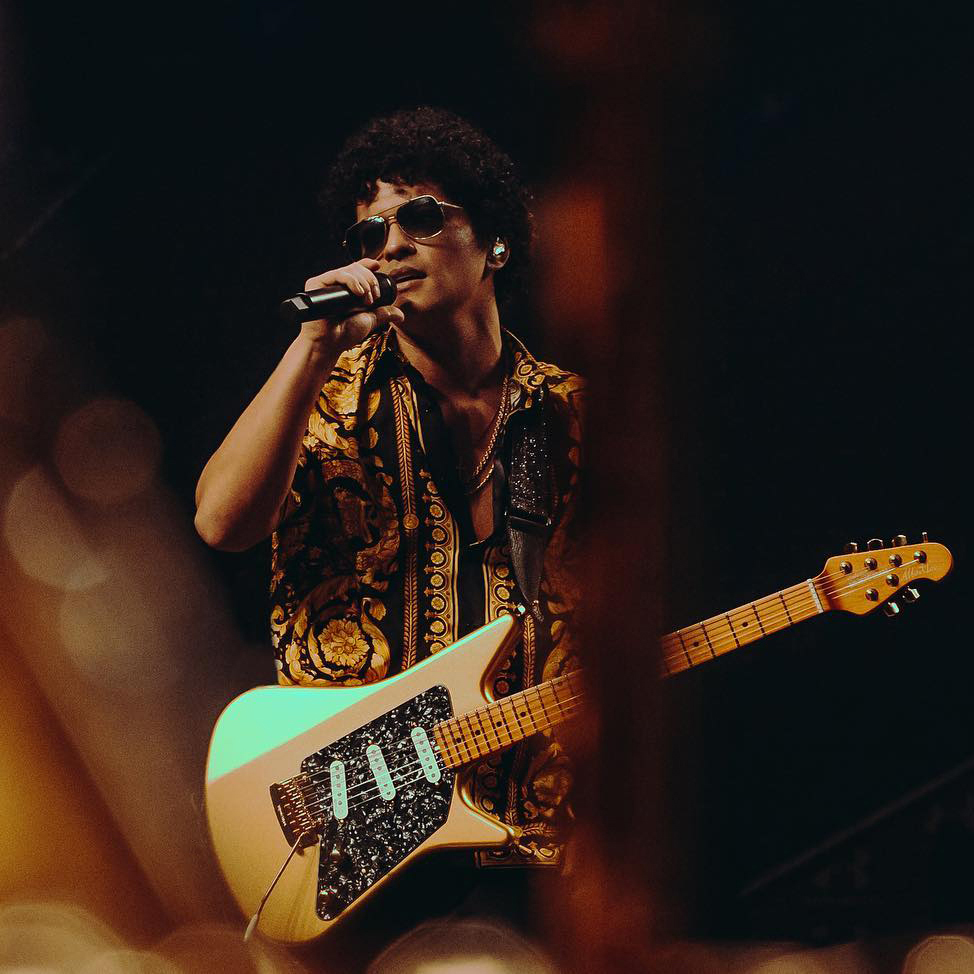
So, for Halloween I decided that I wanted be the ‘24K Magic’ singer in his current embodiment, dressed in Versace baroque print shirts, dripping in gold chains, and topped with his signature white cap. I think my boyfriend was a bit skeptical about this costume idea but I was pretty confident that I could pull it off.

YouAndNah_Bruno_Mars_Halloween_Costume_Inspo5.jpg
YouAndNah_Bruno_Mars_Halloween_Costume_Inspo2.jpg
YouAndNah_Bruno_Mars_Halloween_Costume_Inspo3.png
YouAndNah_Bruno_Mars_Halloween_Costume_Inspo4.jpg

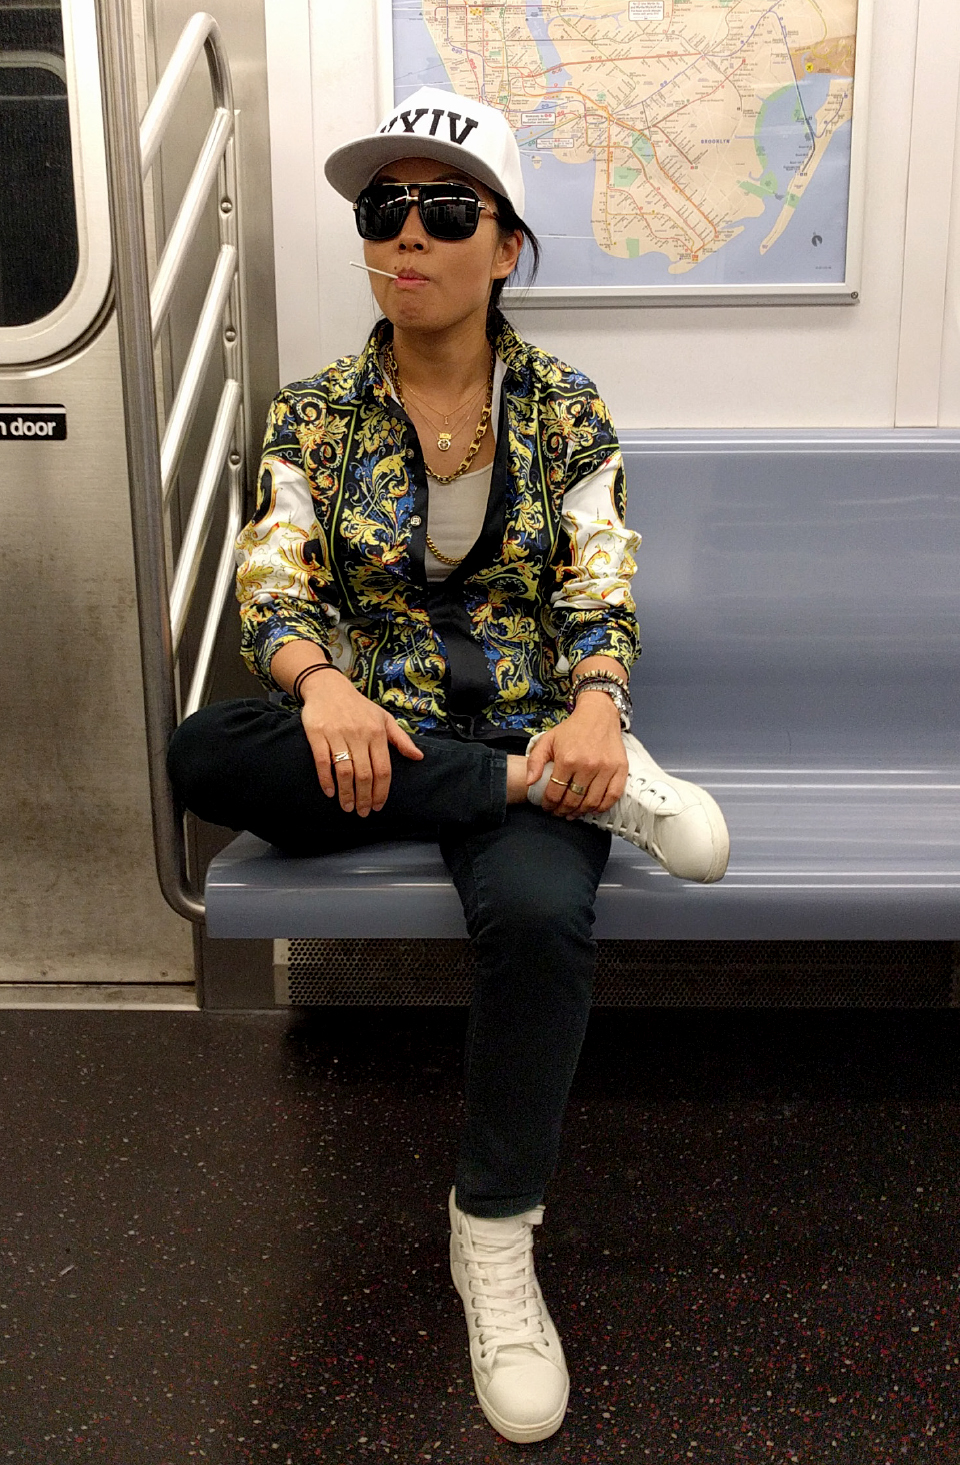
This is definitely one of my simpler Halloween costumes I have done compared to some of my past ones but it was still fun to comb the internet for a ‘silk’ shirt that looked like Versace without the Versace price tag and gold jewelry that would not make my skin turn green. And it would be my first time dressed as a man.

I got my shirt, sunglasses and gold chains from Amazon. My friend helped get me the iconic XXIV hat via Taobao, the Chinese Amazon where you are literally buy anything including cleaning services. I added my own gold rings, necklaces, and even a chain off of a Tory Burch bag. Threw on some black pants and white kicks and I was transformed into a “dangerous man with some money in my pocket…keep up.”

I almost forgot that I got a curly wig and was hoping to trim it and sew it to my cap but that was a big fail as it immediately became apparent that there was no way my already huge head and a wig would fit inside a cap without sliding off to reveal my wig cap.

YouAndNah_Bruno_Mars_Halloween_Complete3.jpg

I had so much fun photoshopping the below picture while imagining what it would have been like to be Bruno’s sidekick in this music video. But, who am I kidding? If I ever had the opportunity to be on the set of his music video I would be probably awkwardly standing in the corner completely starstruck and speechless. Sigh, a girl can still fantasize…

YouAndNah_Bruno_Mars_Halloween_Complete6.jpg
 

Bruno Mars & her Bruno Earth

I, of course, had to include my boyfriend in the fun so I made him a graphic t-shirt, ironing on gold heat transfers in the shape of the earth. So that he would be Bruno Earth to my Bruno Mars. Get it???

Yes, I know I am sooo lame. lol.

YouAndNah_Bruno_Mars_Halloween_Complete2.jpg

Bruno Rose Vs. Bruno Mars. Who wore it better?

YouAndNah_Bruno_Mars_Halloween_Complete1.jpg

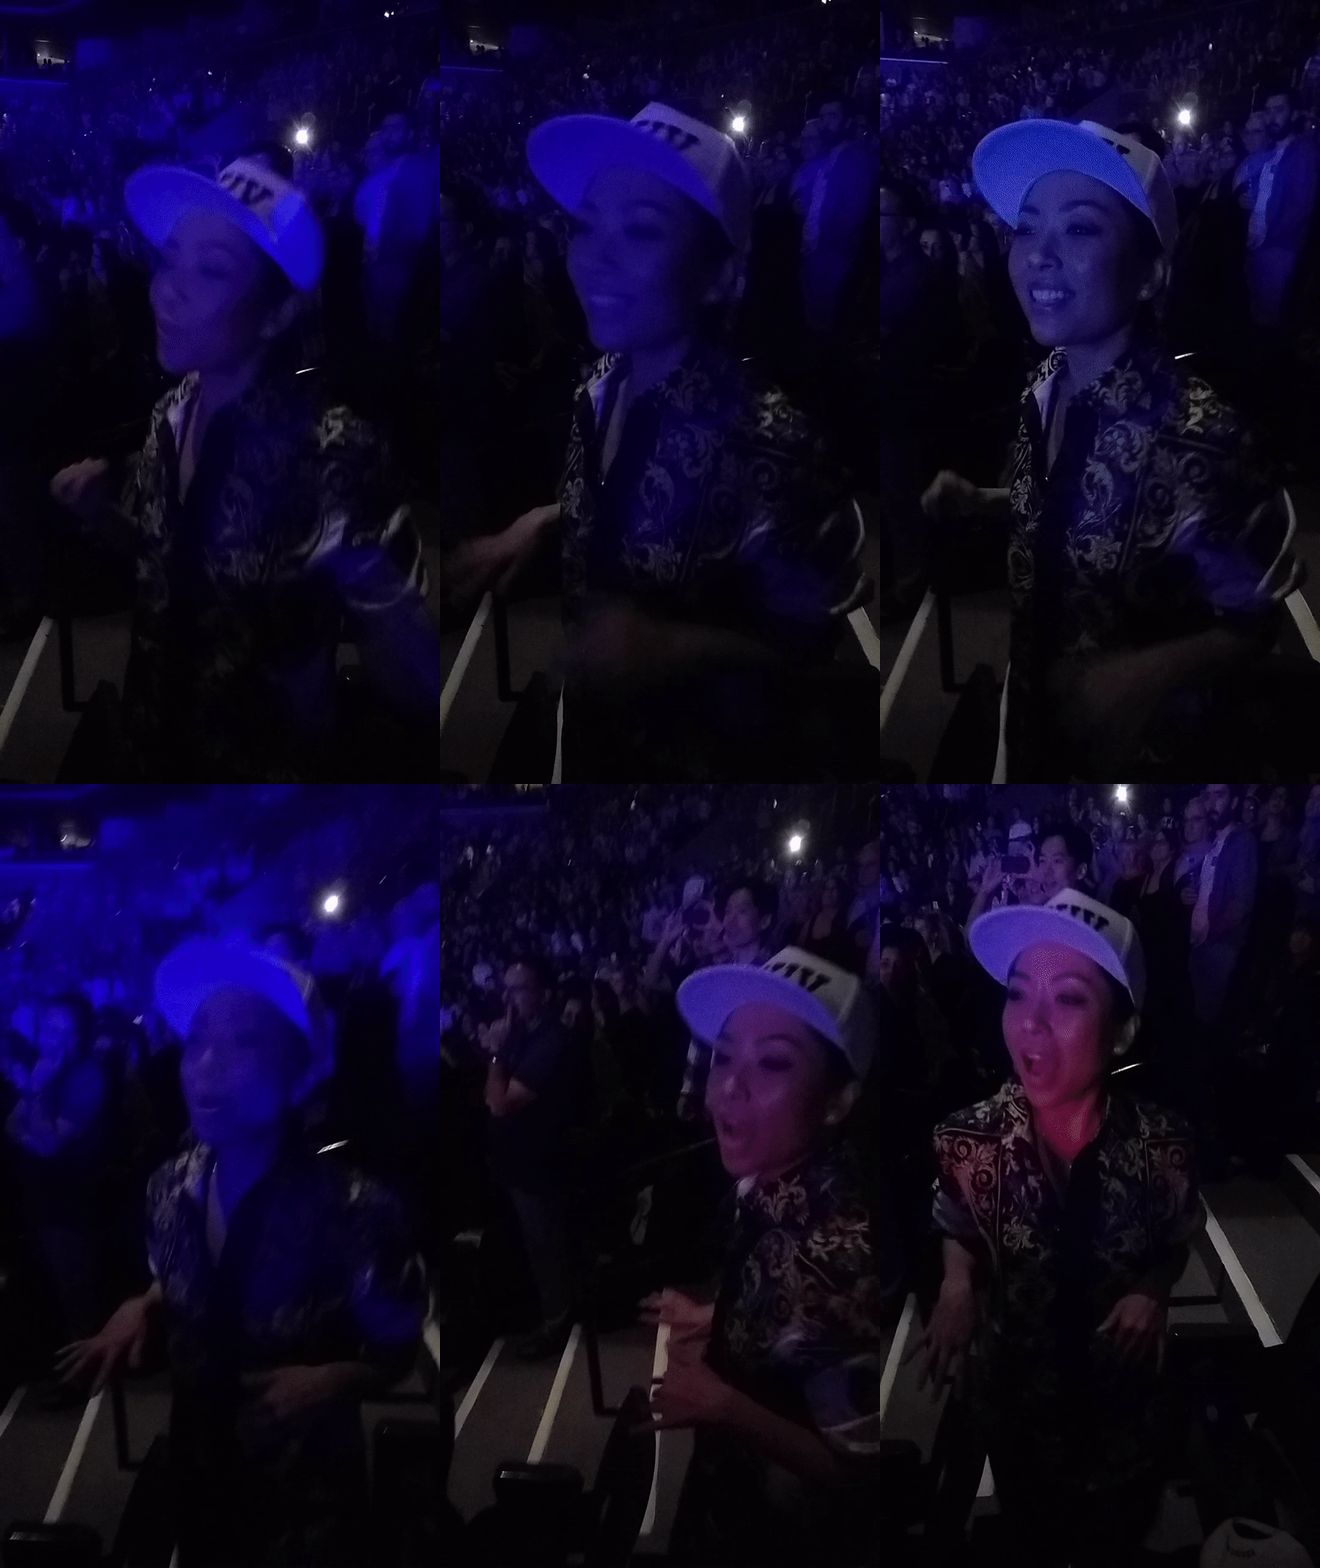
October 2018 Update: I decided to splurge and get tickets to the Bruno Mars concert in Brooklyn. I knew I wanted to repurpose my costume for the show, but was a bit apprehensive about wearing it as I am a super shy person who does not like to attract attention. But, as they say ‘YOLO!’

I was probably the only person who dressed like a crazy super fan and once Bruno hit the stage I was so glad I did. I was on cloud nine singing my heart out and dancing like there was no tomorrow. The night went by too fast but I tried to savor every second of it and bask in the simple luxury of seeing one of my favorite singers live.

YouAndNah_Bruno_Mars_Halloween_Complete5.gif

Sweet Taste Test: DIY Box of Gummies

I absolutely love gummy candies. So imagine my excitement when I stumbled upon Sockerbit, a charming Swedish candy shop in New York City's West Village. It is a candy lover's paradise with a plethora of gummy treats to choose from in a minimally-designed space that is undeniably Scandinavian.

After joyfully eating through half of my purchased sweets even before I made it home, I was inspired to send some to my boyfriend back in California. Of course, I would make a DIY project out it, designing a custom candy box filled with treats for him to sample.

ThenComesColor_DIY_SweetTasteTest_Sockerbit2.jpg

I began my project by taking a trip back to Sockerbit and picking out sixteen different gummies. It was really hard to narrow down my selection but I tried to pick a variety of flavors, colors and shapes. I also tried to make sure they would comfortably fit into the candy box. Aren't they all so colorful and pretty!?

ThenComesColor_SweetTasteTest_Gummies.jpg

I would need to design a few printed items to bring this candy box to life. I began by creating a box liner with each gummy's name and assigned number on it.

ThenComesColor_DIY_SweetTasteTest_Lining1.jpg

I inserted the box liner into the base of a plain white box that I got at a craft store. This box measured 4.37"(L) x 5.75"(W) x 1"(H).

ThenComesColor_DIY_SweetTasteTest_Box.jpg
ThenComesColor_DIY_SweetTasteTest_Lining2.jpg

A box label reading "Sweet Taste Test" was adhered to the center of the lid.

ThenComesColor_DIY_SweetTasteTest_Label.jpg
ThenComesColor_DIY_SweetTasteTest_Lining3.jpg

Next onto the box divider. I cut three strips of cardstock to fit the width and height of the box and three strips to fit the length and height. Then I cut three evenly-spaced slits in each strip, making sure not to cut all the way through. I, then, carefully inserted the strips into one another to create a secure interlocking piece, as seen in the below right image.  

ThenComesColor_DIY_SweetTasteTest_Divider1.jpg
ThenComesColor_DIY_SweetTasteTest_Divider2.jpg

The divider fit perfectly into the box. What a relief!

ThenComesColor_DIY_SweetTasteTest_Divider3.jpg
ThenComesColor_DIY_SweetTasteTest_Divider4.jpg

Next, I designed a score card that asked my boyfriend to rate each gummy on a scale of 1 to 10, with 10 being the tastiest. The scorecard also asked if each gummy tasted better than my favorite gummy of all time, Autodrop Cadillacs from Holland. They are the only things that make my tastebuds literally jump when I think about them. I am salivating right now!

ThenComesColor_DIY_SweetTasteTest_ScoreCard.jpg

And finally a note card with a poem. As what candy box would be complete without a one? Definitely not this one.

ThenComesColor_DIY_SweetTasteTest_Poem.jpg

Now for the best part! Placing each gummy into its new home.  

ThenComesColor_DIY_SweetTasteTest_Gummies2.jpg

Assembling everything together.

ThenComesColor_DIY_SweetTasteTest_Complete1.jpg
ThenComesColor_DIY_SweetTasteTest_Complete2.jpg

The finished candy box came out better than I would have expected. It was too cute to part with but off I shipped it to the West Coast knowing how much my boyfriend would get a kick out of this surprise gift. He absolutely loved all the gummies, especially the #Social candy ones but we both agreed that nothing beats the taste of an Autodrop Cadillac.

This was a really fun and unexpected project that was not only so much fun to make but tasty as well. I think I may need to head over to Sockerbit soon to get my sweet fix!  

ThenComesColor_DIY_SweetTasteTest_Complete3.jpg

Oh so sweet! DIY gift

ThenComesColor_DIY_SweetTasteTest_Complete4.jpg
ThenComesColor_DIY_SweetTasteTest_Complete5.jpg